How to Convert Image Sequence to Video: Complete Guide
- BioPic Studios

- Feb 3
- 6 min read
Updated: Mar 2
To convert an image sequence to video using the BioPic DIY Slideshow Editor: Open the editor, upload your photos, arrange them on the timeline, set display timing for each image, add background music and transitions, then export as an MP4. The entire process takes about 15 minutes for a 3-minute video.
The BioPic DIY Slideshow Editor makes it simple to convert your image sequence to video—no software downloads or technical skills required. Whether you're creating a memorial tribute, celebration video, or photo montage, you can transform your photos into a polished video directly in your browser.
This step-by-step guide walks you through the entire process using the DIY Slideshow Editor (https://editor.biopicstudios.com/).
Step 1: Start a New Project
Let’s get started with transforming your collection of images to a meaningful video slideshow. From the dashboard, click "Create New Project" to begin.

The first step is to give your project a title.

Step 2: Upload Your Photos
Next, we’ll gather all the photos you wish to include in your video and bring them into the editor.
Click the "Upload Photos" button or drag and drop images directly into the Media Bin.
Supported formats: JPG, PNG
Maximum file size: 50MB per image
Recommended: 1920x1080 pixels or higher for best quality
The editor automatically processes your uploads and displays them in the Photos tab on the left side.
Want to gather more photos from family and friends? Use the "Collection Link" at the top-right to invite others to contribute photos—they can add images directly to your project without creating an account.

Step 3: Arrange Photos and Add to Timeline
Now that you’ve gathered your photos, let’s start creating by organizing your photos. There are a few ways to do this, but we will outline the simplest process to get your video made quickly.
Start by adjusting the order of photos in the photo tab. You can do this by either dragging and dropping a photo…

or clicking the “Position: #” to move a photo across further ranges.

Once your photos are organized in the sequence you would like in the Photos tab, add them all at once to your timeline by clicking the “Select All” button, and then the “Add Selected Photos to Timeline” button. You will see all your images in the order you set appear on the timeline.

By default, images are set to display for a duration of 5 seconds. You can adjust this before adding photos to your timeline above the “Select/Deselect All” buttons.
You can also click and drag an individual photo to a specific spot in your photo sequence.

Once all your photos are added to the timeline, click and drag to rearrange individual photos into the final sequence. For more advanced editing, you can select multiple clips by holding Shift and clicking to select a range, or Ctrl/Cmd and clicking for individual selections. You can also click and drag the yellow end points of photos to change their duration.

Efficient Editing: Speed up your workflow with keyboard shortcuts: Press the spacebar to quickly play or pause your preview, and use the Delete or Backspace key to instantly remove selected photos or text from your timeline. Don't worry about making mistakes; you can always undo your last action with the Undo button or Ctrl+Z (or Cmd+Z on Mac), and Redo (Ctrl/Cmd+Y).
Step 4: Add Background Music
Once you are happy with your final photo sequence, it’s time to add your music.
Click on the “Music” tab above the media bin to access this space. You can upload any music files you own via the upload button or dragging into the upload field.

Once uploaded you will see your tracks under “My Music”. Add them to your timeline just like you did with photos - either select and click the “Add to Timeline” button, click the “+” button on the track tile, or click and drag to the timeline.
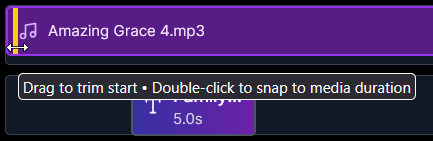
Once your track is on the timeline, you’ll want to trim it to align with your slideshows. Click the yellow drag handles on the beginning or end of your track to adjust it to where you’d like it to end in your slideshow. To automatically trim the song to the length of your slideshow, double click the trim line.
If you have multiple tracks, there will be an automatic crossfade between tracks wherever one ends and another starts to ensure smooth transitions between your audio selections..
If you do not have your own music files you can browse our built-in Music Library:

Step 5: Customize with Text, Motion, & Transitions
Once your music is finalized, you’re nearly done! There are just a few more options and features to consider.
There are two toggles to add a more cinematic feel to your slideshow:
Motion Toggle: Adds subtle zoom in/zoom out effect to photos
Transitions Toggle: Adds a fade in effect between photos
If you’d like to add any text to your slideshow, such as Title/Chapter slides or Text Overlays, click the “Text” tab above the media bin.
Click the “Add Text” dropdown and select the type of text you’d like to add to your slideshow.

Text Overlay will add text over a selected photo
Title Slide will add a blank slide to the start of your slideshow where you can customize the background color and text
Blank slide will add a slide wherever your playback cursor is in your media timeline
To customize the text, click on the text tile in the Text Timeline area.

You will see the Media Bin has changed to a Text Properties panel, where you can adjust the font, font color, background color, and position of the text, as well as the text itself.

Note that there is an automatic fade-in/fade-out for text, so you will need to adjust the playback slider to the center of your photo/text tile to see how the text looks in the Preview and make adjustments.

Once you have completed adding any text, you are ready to export!
Step 6: Preview and Export
Before exporting, use the preview window to watch your creation. To quickly jump to any part of your video, simply click anywhere on the timeline's ruler (the bar above your media tracks with time markings).
When ready, click "Export" in the top-right corner to see your export options:

Free Preview Export (Watermarked):
Generate a watermarked preview at no cost.
You can do this as many times as needed to get your slideshow just right.
Premium Export (No Watermark):
Use this once you are 100% happy with your preview export. This will prompt you to pay to receive your final file with the watermark removed.
If there are any issues in your final export, you can make adjustments and export a second time with any revisions. Please be sure to check your changes with the preview export first
Troubleshooting
Photos won't upload: Verify the files are JPG or PNG formats. HEIC format, which are commonly found on iPhoto, are not compatible with the editor. You can use an online converter or use a simple image editor to open and save your file in a compatible format.
Editor is moving slowly: This could be due to a few possible causes:
It could be a slow internet connection on the user side.
The service hosting the editor online could be having issues. Try again in a little bit.
Very large projects with many high-resolution files can sometimes require more processing power. If you experience slowness, try closing other browser tabs or applications.
Doesn’t fit on my screen: The editor is not optimized for mobile/tablets, we recommend a desktop PC with a monitor or a laptop. Smaller monitor laptops may also have sizing issues. You can resize elements of the editor by clicking and dragging to the right of the media bin and in between the playback buttons and the timeline.
Need help with issues not listed here? Click the “Contact Us” button at the top right of the editor to report the issue. Our tool is new and we are looking to improve any performance issues, so please let us know if you run into problems.
Ready to start? Open the DIY Slideshow Editor:
If you’d prefer to hand off the work to our professional team of editors and documentary filmmakers, reach out to us at BioPic Studios. We’d be honored to partner with you to create a lasting tribute for your loved ones.

