How to Create a Photo From Video: 3 Simple Methods
- BioPic Studios

- Dec 12, 2025
- 5 min read
Updated: Mar 2
To create a photo from video, pause your video at the desired frame and take a screenshot, or use dedicated software like VLC Media Player's snapshot feature. For higher quality results, use video editing apps like CapCut or DaVinci Resolve that export full-resolution stills. The key to great video to photo conversion is starting with high-quality footage.
This technique is especially valuable when creating a tribute slideshow to honor a loved one, celebrate a milestone, or preserve family memories. Those candid video moments from family gatherings often capture expressions and emotions that posed photos miss entirely.

Why Extract Photos From Video?
When gathering images for a tribute slideshow, you may find that some of the best moments exist only in video form: a genuine laugh at a birthday party, a quiet moment with grandchildren, or the last family vacation together. These unposed moments often carry more emotional weight than traditional photographs.
Extracting stills from video lets you:
Capture candid expressions that weren't photographed
Include moments from recent years when most memories were recorded as video
Find the perfect frame from a moving moment
Expand your photo collection for a more complete tribute
Once you've extracted these precious frames, the BioPic DIY Slideshow Editor lets you combine them with traditional photos to create a complete tribute video for any occasion: a memorial, wedding recap, graduation celebration, or family slideshow.
What You'll Need Before Starting
Before you extract photos from your video, make sure you have:
Your video file in a common format (MP4, MOV, AVI, or similar)
A device to work on (smartphone, tablet, or computer)
Enough storage space for exported images
Optional: Video editing software for better quality results
The resolution of your source video determines the maximum quality of your extracted photos. A 4K video produces roughly 8-megapixel stills, while 1080p footage yields about 2-megapixel images. Both are sufficient for slideshow use.
Quick Method: Screenshot While Paused
The simplest way to turn video into pictures requires no special software. Just use your device's built-in screenshot function.
Steps to Screenshot a Video Frame:
Open your video in your default player or gallery app
Play the video and pause at your desired moment
Use your device's screenshot method: iPhone/iPad: Press Side + Volume Up buttons simultaneously
Android: Press Power + Volume Down buttons together
Windows: Press Windows + Shift + S or Print Screen
Mac: Press Command + Shift + 4, then click and drag
Open the screenshot and crop out the player controls
Tip for photo slideshows: Screenshots work well for quick extraction, but you'll want to crop tightly around your subject and adjust brightness if the original video was dimly lit.
Desktop Method: Using VLC Media Player
VLC Media Player is free, works on Windows and Mac, and captures frames at the video's native resolution. This makes it ideal for video to photo extraction when quality matters.
Steps to Extract Photos Using VLC:
Download and install VLC Media Player (free)
Open VLC and load your video via File > Open Media
Play the video and pause near your target moment
Press the E key to step forward one frame at a time
When you find the perfect frame, click Video > Take Snapshot (or press Shift + S)
Find your image in your Pictures folder (PNG format by default)
VLC's frame-by-frame navigation helps you find exactly the right moment: the smile before they noticed the camera, or the look exchanged between loved ones that tells a story.

Mac Method: Using QuickTime Player
QuickTime Player comes pre-installed on every Mac and offers a simple way to extract frames without downloading additional software.
Steps to Extract Photos Using QuickTime:
Open your video in QuickTime Player
Play the video and pause at your desired frame
Use the left/right arrow keys to step frame-by-frame
Take a screenshot: Command + Shift + 4, then click and drag to select the video frame
Find your screenshot on your Desktop (PNG format)
Tip: For batch frame export, go to File > Export As > Images to export frames as a sequence. This is useful when you're not sure which exact moment you want.
Mobile Method: Using a Video Editing App
Mobile apps give you precise control when you need to get a picture from a video on your phone. They're perfect for extracting photos while reviewing old videos with family.
Steps Using CapCut (Free, iOS & Android):
Download CapCut from the App Store or Google Play
Tap New project and import your video
Use the timeline to scrub to your desired frame
Pinch to zoom the timeline for frame-by-frame precision
Pause on your chosen frame
Take a full-resolution screenshot, or export a 1-second clip and screenshot from that
Alternative Mobile Apps:
iMovie (iOS): Free for Apple users, integrates with iCloud Photos
Adobe Premiere Rush: Cross-platform with professional features
Google Photos: Built-in frame export on some Android devices

Tips for Better Quality Stills
The quality of your extracted photo depends largely on your source video. Here's what makes the difference:
Best Practices When Extracting:
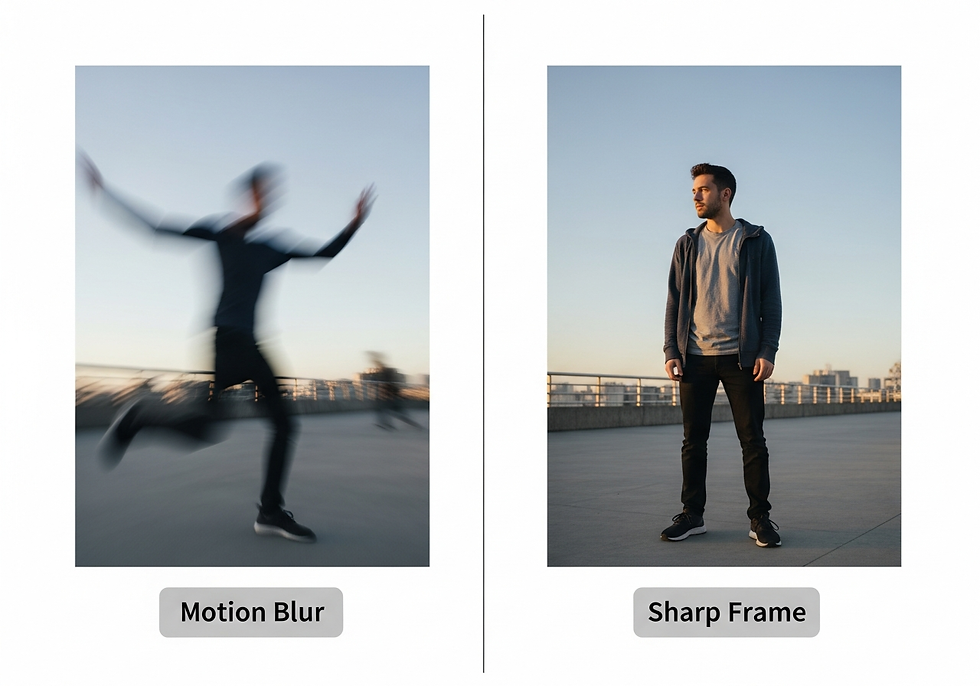
Choose moments of stillness because frames during movement will be blurry
Look for good lighting since indoor videos may produce grainy stills
Export as PNG for editing flexibility before adding to your slideshow
Check for compression artifacts (blocky areas in dark regions)
Crop to focus on faces to improve perceived quality
Quality Reality Check:
Video frame grabs work beautifully for slideshows displayed on screens. For printed photos or large displays, you may notice some softness compared to original photographs. But for capturing moments that only exist on video, that tradeoff is worth it.
Turning Your Extracted Photos Into a Tribute Video
Once you've extracted the perfect frames from your family videos, you're ready to incorporate them into a meaningful tribute. The BioPic DIY Slideshow Editor makes it easy to:
Upload your extracted photos alongside traditional photographs
Arrange images in chronological or thematic order
Add music that captures the spirit of your loved one
Include text overlays for names, dates, and meaningful quotes
Create a polished video tribute you can share at services or with family
The editor is designed for tribute slideshows, whether honoring a loved one, celebrating a milestone, or preserving family memories. Every feature supports creating an emotional, polished video from the music library to the transition styles.
Troubleshooting Common Issues
Blurry Frames
Problem: Every frame looks blurry or smeared.
Solutions:
Try frames from slower moments when subjects weren't moving
Use frame-by-frame stepping (E key in VLC) to find sharper frames
Accept that some video moments may not yield usable stills
Low Resolution Output
Problem: Extracted photo looks pixelated when enlarged.
Solutions:
Use VLC or an editor instead of screenshots because they capture native resolution
Crop the image to focus on the subject rather than enlarging
For slideshows, even lower resolution images display well on screen
Can't Find the Right Frame
Problem: You keep missing the exact moment.
Solution: Use frame-by-frame navigation. In VLC, press E to advance one frame at a time. Most moments that feel instantaneous actually span multiple frames, so you'll find one that works.
Start Creating Your Tribute Slideshow
Extracting photos from video opens up years of memories that might otherwise be locked away in video files. Those candid moments, the ones where nobody was posing for a camera, often become the most treasured images in a celebration video or family slideshow.
Ready to turn your collected photos into a meaningful slideshow? Try the BioPic DIY Slideshow Editor to create a professional tribute video yourself, or explore our full-service memorial video options if you'd prefer expert help.
